How to Sharpen a Straight Razor: Complete Stropping & Honing Guide for Cut-Throat Razors

We may earn a commission for purchases using our links. Learn more
After mastering the art of wet shaving, you need to learn how to sharpen your straight razor. We say ‘learn’ because the process is not as straightforward as one might think. But luckily, it does not require any special knowledge to understand the process. There are a couple of ways to sharpen a straight razor. The process you choose depends on how dull the straight razor is and your preference.
So far, you’ve come across several terms, including honing and stropping. To ensure you don’t get bogged down by the technicalities and learn how to sharpen even the best straight razor for beginners properly, we’ve come up with a quick guide.
But before we get into the heart of the matter, how do you know your straight razor needs sharpening?
How Do I Know My Straight Razor Needs Sharpening?
Generally, using a straight razor offers a great experience. But over time, it gets dull until finally, you feel it unpleasantly scraping across your skin. We call this tugging. At this point, you know the blade is dull, and it needs some honing and/or stropping.
Speaking of which, these two techniques achieve the same goal but through different processes. However, even the best straight razor needs regular stropping to maintain sharpness and honing once in a while. So what is the difference between the two?
The Difference between Honing and Stropping
Before we get into the details of sharpening a razor, let’s look into the difference between the above terms.
When straight razors become dull, it’s their blade edges that microscopically curled back after use. Why does this happen? Well, as fragile as the human hair looks, it has a tensile strength similar to that of copper. Therefore, it’s only logical that the razors will need regular touchups for the best shaving experiences.
The difference between the two processes can be explained below;
- Honing – it creates a bevel
- Stropping – it realigns the edge at a microscopic level
Which of the two do your current razors need? To determine this, you first need to know how dull or sharp the safety razor is. As you sharpen the razor, you start with sharpening (honing) and then progress to stropping. The dullness of the blade will determine the grit you need. Generally, the stages can be split into:
- Sharpening – it’s less than 4k grit. It involves resetting the bevel after misuse or long-term use.
- Polishing – it requires 8k grit. This grit level is ideal for straightening the blade edge after a short time before use.
- Finishing – the grit level is between 10k and 12k. This grit range maintains the edge of the razor. As such, it should be done after a couple of months.
- Stropping – requires a grit level of not more than 50k. Such grit is perfect for preparing the blade daily before a shave.
After preparing the straight razor, how do you know it’s ready? Well, you can opt for the shave test or the arm hair test, or the thumb pad test. With the arm hair test, you use a straight razor to shave hair against the grain.
And since arm hair is finer than facial hair, it’s easy to tell if the razor is shave-ready or needs some more razor sharpening or not. On the flip side, the thumb pad test is ideal for lower grinds. You should run your thumb across the razor’s edge to test its sharpness. Make sure you do not run your finger along the razor’s edge as you might end up with a cut. With this test, you should feel a slight grip accompanied by a tickling sensation when the razor is sharp; however, you should still consider the arm hair test for confirmation. On the flip side, if you get an overly ticklish sensation, it’s not ready, and if it digs into every fingerprint bump, it’s probably over-honed.
Stropping Accessories
There are many ways you can strop straight razors. But before diving into that, here are the types of strops available.
Hanging Strop
This is by far one of the most common strops available. It has a leather side and a canvas side and they are both attached to a hook on one end. From the name, you can guess how it’s used or set up; it’s hung on a hard surface and pulled tightly when in use.
Hanging strops are available in varied widths and lengths. The width can range between 2 and 3 inches. If you get a 3-inch wide strop, you’ll not have to use the x pattern when you strop (this pattern is useful when the width of the strop is smaller than the length of the blade).
Hanging strops sport varying prices depending on the type of leather and quality of canvas used.
Paddle Strop
These strops are simply pieces of wood with strips of leather sides (the leather is glued to the sides). They have a handle, and some even have four stropping sides. Generally, experts prefer paddle strops because they can feature different materials on their sides. Moreover, you can opt to paste two sides and leave the others clear. And since they are smaller than hanging strops, they are perfect for enclosed spaces. On the flip side, they take a longer time to master.
Unfortunately, paddle strops are rarely sold in the current markets. Stropping experts often build them or scour vintage shops for some beautiful ones.
Loom Strop
These are similar to paddle strops. However, instead of the leather being glued to the wood, it’s wrapped around a metallic bracket that holds it in place. The benefit of this design is that you can adjust the tension like hanging strops while enjoying the convenience of stropping indoors. Moreover, it’s easy to replace the leather when it wears off. These, too, are rare tools. Luckily, they are slowly regaining their popularity.
What Are Pastes and How Do They Help?
Stropping pastes are a perfect addition to any good straight razor shaving kit because they reduce the need to hone your blade. Using a paste adds an abrasive layer, which allows you to perform final touches on the cutting edge.
If you are a beginner, this might sound weird to you; the pastes have grit grades. This is what allows them to help with blade touchups. You can know the grit level of a paste by its color, or the micron indicated. However, these factors aren’t standardized and are, therefore, unreliable.
Overall, most straight razor users prefer red or green chromium oxide paste, which has grit levels of 1 and o.5 microns, respectively. Aside from pastes, you can use diamond sprays to achieve the same stropping goal.
Remember, once you paste a strop, you cannot undo the process. You should, therefore, be careful when using the paste with your blade. If you chose to use paste, you need to have a second strop for your “normal” stropping. Also, don’t use different grades of paste on the same strop.
How to Strop Your Razor
As you will see, stropping isn’t a process you can rush over like the movies seem to suggest. Proper stropping takes time, and you should only do it when you have a lot of it. So how do I strop my straight razor?
Step 1: Set Up
If you choose a hanging strop, ensure you attach it securely to a wall or any sturdy surface. The last thing you want is to pull on the strop, and it comes out, or the furniture topples over. Pull the strop tightly, just enough for your blade to lay flat on the strop surface. If you leave it taut, the slope on the strop can dull your blade instead.
If you choose to use a paddle strop, hold it tightly on the handle so that it does not o as you apply pressure.
Step 2: Blade Placement
Yes, blade placement is essential. Hold the blade at 1800 to the strop and place it close to one end with the blade’s cutting edge facing you. If the strop is wide enough to cover the entire blade’s length, then position it at the center. But if it’s not, place the straight razor’s shoulder against your strop.
Also, you should have the spine and the blade lying flat on the leather. As you strop, you should not raise the spin lest the bevel will roll. Moreover, ensure that the shoulder doesn’t rest on your strop lest irregularities form on the razor’s cutting edge.
Step 3: Stropping
Once you’ve mastered the position, press the blade lightly on the strop and then run it to the opposite end of the strop. As you make this motion, have the blade remain flat. As you do this, remember not to rush the movements. Your priority is to get the proper technique rather than complete the process fast.
If the strop is wide enough, move the razor in a straight line. But if it is narrow, make an X-pattern as we pointed out earlier. With this pattern, you will run the blade along the strop’s diagonal to ensure you work on the entire length of the blade.
Step 4: Roll the Razor
The phrase probably makes you think of a complicated process, but it’s not. Rolling the blade is simply turning the cutting edge to face away from you once you get to the end of the strop. You can also call it turning. However, it is not the same as rolling the blade’s cutting edge (this is a mistake).
As you turn the blade, make sure the cutting edge rotates along the top and not on the bottom close to the leather. If the cutting edge comes into contact with the leather as you turn, it might get damaged. To avoid this, remember that the spine should always be touching the strop surface.
Step 5: Pull the Razor Back to the Starting Point
After the turn, position the blade the same way you did on the first run and then pull it back towards yourself. As you do this, control your movement. And once you return to the starting point, roll the blade again, reposition it and then run it.
Step 6: Repeat
Some strops feature different surfaces on which you can pass the straight razor. You can use the leather strop, but it’s better if you started with the canvas. Why is this? Well, the canvas will clean debris off the razor as well as heat it. The heat reduces brittleness, which causes micro-fissures when you strop.
Moreover, you get to paste the underside of the leather or canvas for blade touchup. The blade is usually ready after the following passes:
- 50 on the leather strop
- 30 on the canvas
- 15 on the pasted surface
Note: the above figures vary depending on the quality of your razor blade and strop. But you can always experiment to find out what works for you.
How to Care For the Strop
Just like it is with regular leather, a strop needs regular care to keep it in good shape. If you don’t take care of your strop, it will warp and crack with time. The perfect product to use in maintaining your strop is saddle soap. It is an all-natural option for cleaning your leather strops. Lathering up the soap, applying it on your strop, and washing it off will nourish the leather. Also, you can use a natural oil like olive oil to nourish it.
On the flip side, if the canvas collects grime and dirt, you should scrub it with some soap as well.
Honing
Now that you understand what stropping is let’s proceed to honing. It’s a process where you place the blade on a mineral-based block or a stone. If you are serious about getting the best honing kit for straight razors, you should have the following grits:
- 4k sharpening stone
- 8k polishing stone
- 12k finishing stone
The best pick for a beginner is a synthetic Waterstone that produces consistent results. These Waterstones are made from minerals fused with aluminum oxide.
As you shop for the best sharpening stone, bear in mind that not all have the same quality. Also, the cheap ones are not lapped (meaning they were not flattened before shipping).
Coticules
Here are different types of natural whetstones, including Coticules and Belgian Blues. These stones are popular and are from the Ardennes mines. They have some natural properties which help them deliver high-quality honing and finishes.
The Coticules are gotten from sedimentary rocks that have been in existence for eons. They are versatile, given the fact that they can make a slurry, which makes honing even more effective. But even with all that they have going on, they require some years of experience. If you use this as a beginner, it means you might damage your razor.
Coticules offer a great finish of above 12k while the Belgian blues are perfect for sharpening. Overall, these tools are expensive, and large coticules can cost a fortune.
Honing a Straight Razor
Like stropping, honing requires that you be patient. If you rush through the process, you might end up having to reset the bevel, a process that needs a professional touch. Honing straight razor steps are as follows:
Step 1: Soaking the Stone
Before you start, you should soak your stone in water for like 15 minutes. Soaking the stone helps to soften the surface and makes honing the blade easier.
Step 2: Place the Stone on a Flat Surface
Most honing stones are sold with rubber casings or mats that prevent sliding when you apply pressure. If yours doesn’t have one, you can find a flat and rough surface that will keep it stationary. Also, you should have it in front of you; this way you do not strain it.
Step 3: Position the Razor Blade
With stropping, you always run the blade as it faces away from the direction you are moving it to. But with honing, the blade goes first. As such, you need to be extra careful because of a slight loss in concentration, and you might dig into the stone. If this happens, you will start from scratch.
To prevent this, make sure that the razor lies flat on the surface such that the shoulder is touching the stone surface, but it’s not rubbing against it. If the shoulder rubs against the stone, it might yield an uneven hone.
And as you move the blade, have your fingers evenly spread across the spine of the blade and apply slight pressure. Bear in mind that the more pressure you apply, the more metal will be removed from the edge of the blade.
Step 4: Run the Razor Blade
Since the stones are usually narrow, you should use an X pattern. Remember to apply equal pressure on the spine but also reduce it as you progress. Also, using the X pattern to hone will ensure that the flat stone remains flat throughout the honing.
Step 5: Roll the Blade
When you get to the other end of the stone, you should roll the blade carefully. Turn the blade, ensuring the spine remains in contact with the stone. Also, avoid having the cutting edge touch the stone.
Step 6: Bring Back the Blade
You should bring the blade towards your starting point as you try hard to maintain the same pressure you used on the first stroke. When you are back to the finish line, repeat the process until the blade is sharp enough to perform the tests, as we described above.
However, be careful not to over-hone the blade as it will cause major damage. Overall, ten laps are enough. But it always depends on what you want and your razor’s state.
The Pyramid Honing Technique
This method is all about alternating between two grit level stones. The great thing about this technique is that you can start at any point depending on your razor and then work your way down. Below is a brief explanation of how the pyramid method works.
- One stroke with the razor includes running each side of the edge on the honing stone
- Fewer strokes are better
- You can choose the starting point depending on the razor steel and how blunt the razor edge is. For instance, a stainless steel razor will need fewer strokes but frequent honing.
- You can work down the pyramid
How to Use a Straight Razor
Once you have a sharp razor, you can proceed to shave. But if you are new to wet shaving, you probably don’t have the slightest clue of how to go about it. In this section, we shall guide you on how to go about it. Learn more about how to shave with a straight razor.
But before we get into it, we should stress the importance of having the right tools for the job. This includes having the best shaving brush, the best shaving cream, the best shaving soap, and the best shaving razor for men.
Face Preparation
Below are a couple of steps you do before a shave to ensure you get the best shaving experience.
- Take a hot shower – alternatively, you can dab a towel soaked in warm water on your facial hair. The water helps to soften the hairs and open the skin pores.
- Wash your beard – aside from using hot water, wash your beard with shampoo or soap to get rid of natural oils.
Lather Up
To create a thick lather, soak your shaving brush in some hot water. Squeeze some shaving cream into a shaving bowl and mix it with the brush. Once you have a good lather, apply it all over the area you want to shave using circular motions. Let the lather sit on your face for a couple of minutes before you shave.
How to Hold the Razor
Aside from preparation, you need to hold the razor properly. It sounds basic when you read it, but as a first-timer, the straight razor will feel awkward in your hand at first.
Below is an image showing the parts of a straight razor.
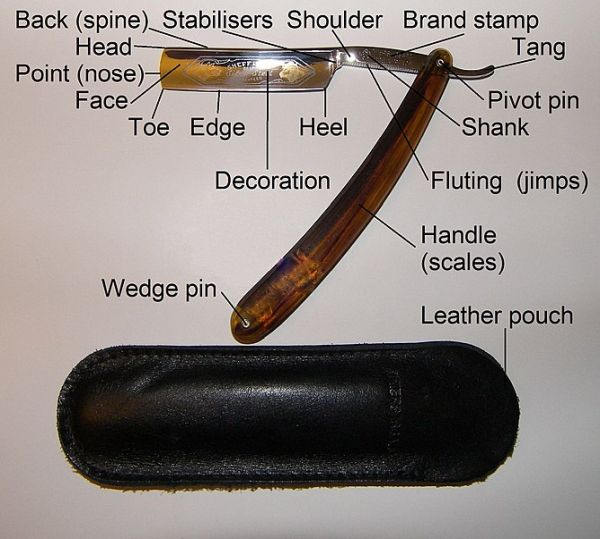
So how should you hold the razor? Simple, place your first finger on the razor’s shoulder and have the thumb at the edge of the heel. The first three fingers will be on the tang, and the pinky will be between the handle (Scales) and the tail. Holding the razor in this manner will afford you more control. Remember, experts have several tips and tricks. But before you try those, get the basics right, and with time, you’ll come up with your own.
Practice the 14 Stroke Shave
The above video describes the 14-stroke shave.
Cheeks
You should start on the right side. Using your free hand, pull the skin upward so that the facial hairs stand upright and are easy to slice through. Shave downwards on half your cheek and then pull the skin upwards and shave some more.
After the cheek, tilt your head back and left to have a better view of the skin under your right jaw. Pull the skin with your fingers and continue shaving, depending on the direction your beard is growing. Repeat the process on the left cheek.
Upper Lip
Stretch the upper lip down and shave downwards as well.
Chin and under the Chin
Stretch the lower lip up and then shave under your chin. To have a better view, you will have to tilt your head back and raise your chin. While in this position, you will pull the skin down and start shaving downwards.
The Passes
For a beginner, one pass is enough. However, if you want a closer shave, then you’ll have to make several passes. However, for every repeat shave, you’ll have to wash the face and apply lather all over again. On the first pass, shave with the grain, and on the second shave across and finally against the grain.
There are several techniques you can use to achieve a smooth and close shave. The most common is the three-pass shave we’ve described above.
After the Shave
Once you are done shaving, rinse your face with some cold water and then apply aftershave or gel. Also, if you cut yourself, then you should use an alum block or a styptic pencil to stop the bleeding fast.
How Do You Sharpen a DOVO Straight Razor?
Before we answer this, here is a fun fact: straight razors are assembled by hand. Quite fascinating right? Now, if you’ve read a DOVO straight razor review, you know that they are marketed as ‘shave ready. And while they are stropped, honed, and pass the tests we’ve described, you still have to strop before you use it. And this goes for any straight razor marketed as shave ready as well. Stropping is a normal process of shaving if you want nothing short of the best experience.
Can You Sharpen a Straight Razor with a Knife Sharpener?
No, you cannot, and you shouldn’t try it. Here’s why. You see, a razor edge is a little more delicate in comparison to a knife’s edge. As such, a knife sharpener will only ruin the razor edge immediately. A knife sharpener will heat the steel and damage it permanently. And just because many people say it’s okay doesn’t mean it is.
How to Sharpen a Straight Razor without a Strop
Stropping refers to using a strop to sharpen a razor. However, if you don’t have one, you can use a stone hone. It is stropping, but as we’ve explained above, there is a difference between the two. Nonetheless, in some instances honing will help. But if you don’t have a strop and the edge needs realigning, you can have a professional do it for you but at a fee.
Conclusion
Now that you know to sharpen a razor and some basic straight razor maintenance and the differences between stropping and honing therein, you feel like a pro, right? Well, you should, but on the flip side, you should practice a lot as well. That’s the only way to get good.

Ruiru Kibet
Ruiru Kibet is passionate about beard care and male grooming. He believes it’s an art form and is happy to share his insight with men across the globe. He’s into wet shaving and evidence-based grooming, a passion that helps him analyze men’s grooming brands, products, and wet shaving practices presenting you with the best recommendations and advice.